The Beaded Hat Tutorial – The Red Road Beader

The Beaded Hat Tutorial – The Red Road Beader

“Hard work beats talent when talent fails to work hard.”

A bit of bitterness leaves its stain I write this to you. I was never the best at anything in my life growing up, there seemed to always be someone better than me at sports, school, art, and pretty much anything else that I chose to pursue. But that never stopped me from trying my hardest at everything, I figured if I wasn’t naturally talented enough the only way to compete on the same level would be to work harder than everyone and truly dedicate my life to mastering my craft.

It wasn’t easy but as the hours turned into days and months pushing my beading work ethic to its limits and now find myself in the position that I currently am in today.  As Native American people even with the odds set up against us we continue to survive, adapt, and prosper over the years is truly what sets us apart from many other cultures. That’s why I fell that is important that we preserve our heritage and pass it down to the next generation for without that and our language we are nothing more than just ordinary people.

Beaded Hat/cap
Beaded Hat By Brodie Sanchez

Native American beaded hats have been around for many generations and are hard to place an exact origin. But If I had to guess it was probably someones’ grandma who would bead anything imaginable. I know a few of these people you go into their house and everything from candlestick holders to clocks are completely beaded, its quite fascinating to listen to them tell you in detail exactly how they made everything and why they did. Most of the time its just so that they could have something that no one else ever has had. Beaded hats are one of the easiest and fastest projects a beader can make, and not to mention they are a great way to make something unique no one that else will ever have.

Beaded hat tutorial
Mr. Hustle Tribe Hat

The hat that we will be using today comes to us courtesy of Mr. Hustle Tribe and the materials that will be needed will be 1 needle, nylon thread, scissors, an awl, ruler, and size 11 cut beads. To start your you’re going to want to thread your needle and locate the center of the front brim of the hat. From here it is all preference to how deep you want to bead into the brim. I chose 4 cm because there was no stitching around the brim that I could use as a guideline. So instead of using a ruler, I marked out the 4 cm line before punching my first hole directly downward in the center of the brim using the awl. The awl is used to pre-punch the holes so that the needle can easily pass through the thickness off the brim and save your fingers the struggle of pushing the needle.

Awl right
Using the awl start in the center of the hat

Starting from the bottom going upwards to hide the knot at the under the brim of the hat string your beads. Depending on how deep you started your first hole will determine how many beads you will need to use to complete one stitch. Mine so happens to be 11 beads.

At this point, I have a choice to make. I can draw on the hat and make a guideline on top and bottom of the hat exactly 4 cm all the way around the brim as a guideline or not draw on it and use a ruler to measure ever stitch before I pre-punch each hole. I chose the more difficult of the two strictly because the hat is white and no matter what I use to draw the line would stain the hat. When beading the hat using the awl and the stitching on the brim as a guideline you will find that this project is really simple.  If you must draw a guideline keep in mind how it will affect the overall finished appeal of your project.

Beaded hat tutorial
Measure and Punch

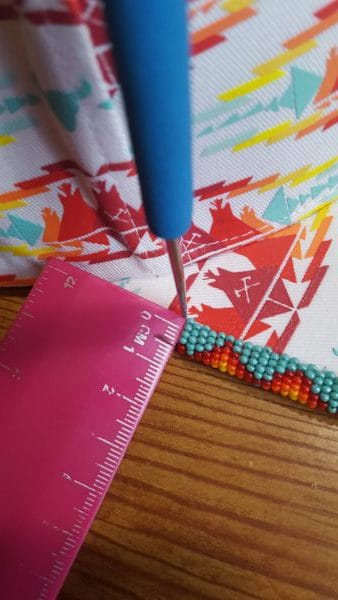
After that, the only difficult part would be getting the spacing right in between the stitches. You don’t want to space out your holes too far to where you can see in between the beads but you also don’t want to punch your holes so close to each other that the beads become jumbled next to each other.

There is a certain sweet spot in between that you want to find, and the only way to learn where it is is to you do it for yourself. Experience is really the best teacher and there is no way really to mess the hat up so bead with confidence and try to improve your spacing with every stitch.


When you run out of thread simply cut you needle off double knot the thread then clip off the remaining thread. To restart where you left off at after re-threading your needle just go straight down the last hole you made and when finished with one side simply tie off and cut the thread again. For those wondering why too start beading the hat from the middle to the outside. This is done so that you can center your design directly in the middle of the hat and will help tremendously throughout the process.

If I were to guess you never beaded before I would say it would take you up to 12 hours at most to finish the project. If you’re more experienced like me, to complete the hat with a guideline you can finish in 4 hours or less.

Finished beaded hat- By Brodie Sanchez

I want to thank you for taking the time out of your lives to read this article please leave some feedback or if you have tips on how you bead hats please do comment below and until next time pow-wow nation happy beading my people and I can be found on all SSM.

Instagram: shohonisanchez07


30 Comments on “The Beaded Hat Tutorial – The Red Road Beader”

  • Avatar for Howard Ball

    Howard Ball

    says:

    Good job with your beautiful work! I have just started beading hats. The time I have taken , has given me a lot of peace! I have been dancing at our local pow wows for the last 40 years. I I’m dancing now Southern Straight. None of our local tribes no anything about this dance. It is getting harder for me to dance, since I turned 83. I also make Native American flutes. Anyway thanks for sharing your story and work. May our Creator bless you!

  • Avatar for Veronica Julian

    Veronica Julian

    says:

    How do you make your design fir the brim of the hat

    • Avatar for Susan

      Susan

      says:

      I do hats & I sometimes measure around the edge of the brim to get an idea of how long my design should be. I also sometimes lay my hat brim on a piece of paper and trace the brim. Then I can sketch a design to see where it will sit on my hat brim. I use an upholstery T pin to make my holes.

  • Avatar for Stella Jennings

    Stella Jennings

    says:

    question: first time trying to bead a hat….I have a hat with stitching. Is it ok to use the same holes from the stitching already on the hat?

  • Avatar for Susan Margaret Shaw

    I have not been confident enough to try beadwork yet. Maybe soon. Just got to go for it, right? thank you for sharing with us your excellent work.

  • Avatar for Running Doe

    Beautiful work, love this much, wado for sharing,

  • Avatar for Jamie DesChenes

    Jamie DesChenes

    says:

    You do beautiful work,Brodie.I wish I was as talented as you!

  • Avatar for Kristy Crouch

    Kristy Crouch

    says:

    Thank you for all of the time you spend in this very important and almost lost native craft. May it spread throughout the nation’s.

  • Avatar for Susan

    Susan

    says:

    Hi Brodie, what are your thoughts on beading into a heavy felt & then sewing or gluing that onto the hat?
    TIA,
    Susan DesJarlait

  • Avatar for Nancy

    Nancy

    says:

    Well, you made it look easy. But, I’ll try it out. Thanks

  • Avatar for Sama Peric

    Sama Peric

    says:

    Thanks for explaining I had a project and definitely this tutorial is exactly what was needed. U are really and inspiration

  • Avatar for Flannery McCarron

    Flannery McCarron

    says:

    Wow! Artwork is really high caliber. This hat would be a reminder of your daily intentions.

  • Avatar for shirley carvajal

    shirley carvajal

    says:

    Thank you for sharing. I have been wanting to try it, I might get brave. We shall see.

  • Avatar for Johanna

    Johanna

    says:

    Wow really amazing love it keep up the great work.

  • Avatar for layasa

    layasa

    says:

    Good job! Brilliant work. I wanna make this.

  • Avatar for misty

    misty

    says:

    could you please include a photo of how u started the hat and how you thread the beads onto the hat, ive never beaded a hat so ? is of the pics- is do u go thru the hat or how do you add the beads. i have beaded many things but never a hat my son been asking me for yrs but could never figure it out

  • Avatar for Verlinda

    Verlinda

    says:

    Wow! Someone willing to share, very informative. Thank you so much

  • Avatar for Greg

    Greg

    says:

    Very nice tutorial. You make it look so easy!

    • Avatar for Brodie Sanchez

      Brodie Sanchez

      says:

      Thank you very much Greg.

  • Avatar for Val Roberts

    Val Roberts

    says:

    Beautiful work Brodie!!

    • Avatar for Brodie Sanchez

      Brodie Sanchez

      says:

      Thank you Val i appreciate the compliment.

  • Avatar for James

    James

    says:

    Where can we buy those hats

    • Avatar for Brodie Sanchez

      Brodie Sanchez

      says:

      You can purchase these hats at http://www.hustletribe.co or follow me on instagram at: shoshonisanchez07 or facebook for direct link to Mr. hustle trsibes information.

  • Avatar for Denise

    Denise

    says:

    Thank you,
    Now I want to try to bear a hat. 🙂

    • Avatar for Brodie Sanchez

      Brodie Sanchez

      says:

      Yes do it!!! i promise you will love it and by the 3rd hat you will be a pro.

  • Avatar for Shawna Redfield

    Shawna Redfield

    says:

    So beautiful!!! What talent ❤️

    • Avatar for Brodie Sanchez

      Brodie Sanchez

      says:

      Thank you Shawna so much.

  • Avatar for Winnie Frazier

    Winnie Frazier

    says:

    Awesome Brodie!

    • Avatar for Brodie Sanchez

      Brodie Sanchez

      says:

      Thank you Winnie!!!

    • Avatar for Linda Circle Bear

      Linda Circle Bear

      says:

      Thank you for sharing, I do my hats the same way…I do have a question though, how do you do you corners? I seem to always get one side right but the other side seems to be odd…I can never get the beads even on the corners, I either bunch them up or they’re a little bit apart…I do bead other stuff besides caps. I don’t bead caps a whole lot only because I can’t get the corners to match and I take pride in my work and want it to look awesome…once again thank you and have a blessed day

Leave a Comment

Your email address will not be published. Required fields are marked *


Find a Pow Wow
Near you

Search the US & Canada

What to expect
at your first Pow Wow

Sign Up for our Free E-newsletter