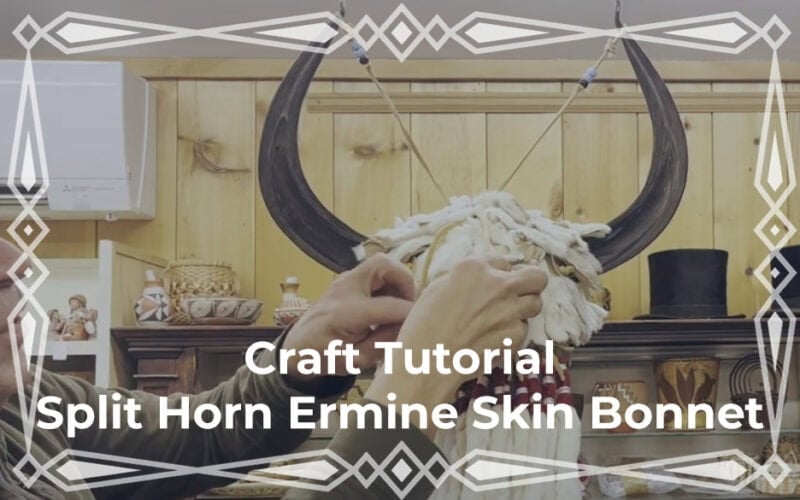
Our friends at The Wandering Bull are back with another craft tutorial.
Split horn ermine skin bonnets are a striking and meaningful style of headdress that have been worn since the mid-1800s by Native people of the Northern Plains, the Rocky Mountains, and into Canada. In a recent tutorial, Chris from The Wandering Bull shared the step-by-step process for creating one of these traditional pieces.
The Headdress Style
This type of bonnet features split buffalo horns mounted to a crown, with rows of ermine skins and decorative beadwork or quillwork across the brow band. Feathers, horsehair, and beads are often added for further embellishment. While historic examples date back to the 1850s, this style continues to be created and worn today.

Materials You’ll Need
Chris explained that building a split horn ermine skin bonnet requires several key components:
-
Crown: The base that everything attaches to, made from brain-tanned deer hide or a felt hat. A baseball cap can even be cut apart and used as a pattern to ensure the crown fits properly.
-
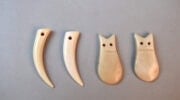
Rawhide: Cut into an L-shape to secure the horns firmly to the crown.
-
Buffalo Horns: Split, flattened, polished, and lightly steamed to create a curved effect.
-
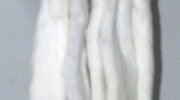
Ermine Skins: Typically 15–20, sewn into tubes and finished with a red wool tip. These hang down the back of the bonnet.
-
Brow Band: Traditionally quilled on rawhide, but beadwork done with lazy stitch or loom beadwork can also be used.
-
Decorations: Horsehair, crow beads, feathers, elk teeth, and abalone shells can all be added for personal style and cultural significance.


Building the Crown
To start, Chris cut apart a baseball cap to use as a sewing pattern. The six sections of the hat were traced onto leather, cut out, and then stitched together with imitation sinew using a whip stitch. The result is a durable crown base that fits comfortably.
Preparing the Ermine Skins

Each Ermine skin is sliced, sewn into a tube, turned right side out, and tipped with red wool. These are carefully stitched so they can hang evenly from the back of the bonnet. Chris explained that summer Ermine skins are brown while winter ones are white, and older skins may lose their black-tipped tails.

Attaching the Horns
The split buffalo horns are mounted onto rawhide supports, which are then secured to the crown. Decorative strings and beads help stabilize the horns and keep them upright. Horsehair is often tied to the horn tips, along with small clusters of feathers.

Final Touches
Once the horns are in place, rows of Ermine skins are sewn to the back of the crown. Chris also added:
-
A pink abalone concho shell with elk teeth and beads hanging down.
-
Feather bundles at the horn bases.
-
A recycled loom-beaded brow band from the 1940s to complete the front of the bonnet.
The finished piece combines strength, craftsmanship, and traditional style.

Preserving Tradition
This tutorial offers a fascinating look into the craftsmanship and detail involved in making a split horn Ermine skin bonnet. From carefully sewing Ermine skins to the challenge of splitting and polishing buffalo horns, each step reflects both artistry and cultural heritage.

For more craft supplies and tutorials, visit The Wandering Bull online.
Last Updated on September 19, 2025 by Paul G